The Build
- Jul 4, 2020
- 7 min read
Building the van out was a huge learning experience. But with the help of family, friends and the hundreds of Vanlife resources online, we were able to get it done! Our focus was to use up materials we had on hand, keep it lightweight, and keep it cheap. The cheaper the build the longer we could stay on the road. The end result isn't the prettiest build out there but it has worked for us the past 6 months. It is amazing that with such a small space, you can still build it a 1,000 different ways.

Prep
With so many vanlife and overland resources nowadays, we did a ton of research to figure out best methods for our build. Most of these methods included four major steps: insulation, layout, build, and electrical. We didn't follow any one person's advice to the letter and ended up picking and choosing which methods from each step would work best for our budget and timeline. As you'll see, ours is not a perfect build (if there is such a thing) but, we stayed within our means and constructed a (mostly) comfortable living space to get us moving and exploring!
Insulation
Researching insulation was a trip down the rabbit hole. Learning about types of heat transfers like radiation, conduction, and convection, and which types of insulation are best to insulate against them while trying to keep the walls, ceiling and floor from literally closing in more and more, led to a few points of contention between us. Especially since we weren't entirely sure what climate we were going to 'reside in' the most. So here's a brief recap of the steps we took to get the insulation up.
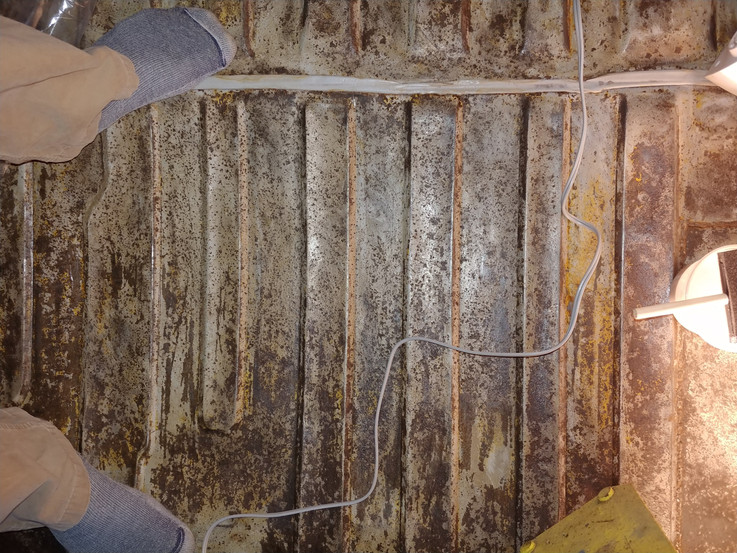
Justin prepped the floor by grinding and scraping away as much paint and loose rust as possible. Then he used a rust converter (Corroseal) which turns black or bluish when in contact with oxidized medal, to slow the spread of the rust.
Spray foam insulation was used in the hollow cavities of the walls to attempt to fill as much as possible and stop the airflow. If we were to do it again, we'd probably use more and in the proper manufacturer recommended temperatures. The middle of winter in Upstate NY is not the recommended application environment for spray foam insulation...
We used window flashing 'tape' as a low budget sound deadener around the wheel-wells and wherever else we felt like throwing it on.
After the foam, we used Reflectix insulation in the cavities that would have a half inch of space or more between the van and the foam board insulation.
We used polyiso foam board for the walls and ceiling and extruded polystyrene (XPS) foam board for the floor. This is where we've seen builds just throw up a sheet of polyiso to cover the whole side of the van. However, doing that would have cost us a good 2-3 inches that we'd rather keep for storage or sleeping. We used cardboard to stencil out pieces of the board to fit as best as possible, then used Zip system flashing tape to keep it in place. Cutting the XPS for the floor was probably the easiest part of the build since we had a floor mat to use as a stencil.
Any leftover Reflectix makes for great sunshades for the windows. Savaria sewed pieces into the side and rear window coverings, as well as magnets to keep them in place.


Layout
The main focus in determining the layout was the bed. We knew we had to have the bed North to South (front to back) where a lot of people are able to do it West to East (side to side). Since Justin is 6'5" and myself am 5'10", side to side just would not be comfortable, nor possible, for us. With that restriction, it really decreased the amount of 'live-able space' we had to work with. Knowing the bed would take up the most space we decided to build that first and then figure out where everything would fit around it.
We had a general idea that we'd like to do storage along the driver side wall in the form of cabinets or shelves. And the obvious under the bed storage that accounts for the majority of our storage space. We taped out a few measurements to get a visual of where the bed would end and we used boxes (yes, that's Savaria hiding behind a box) to mock up the height and width.


Build
We used 1/4" subfloor-quality plywood for the floor and painted it with mold and mildew inhibiting primer/paint. A trip to Ollies Bargain Outlet proved fruitful when we found a roll of faux wood laminate flooring and a couple boxes of peel and stick tiles for less than $30.
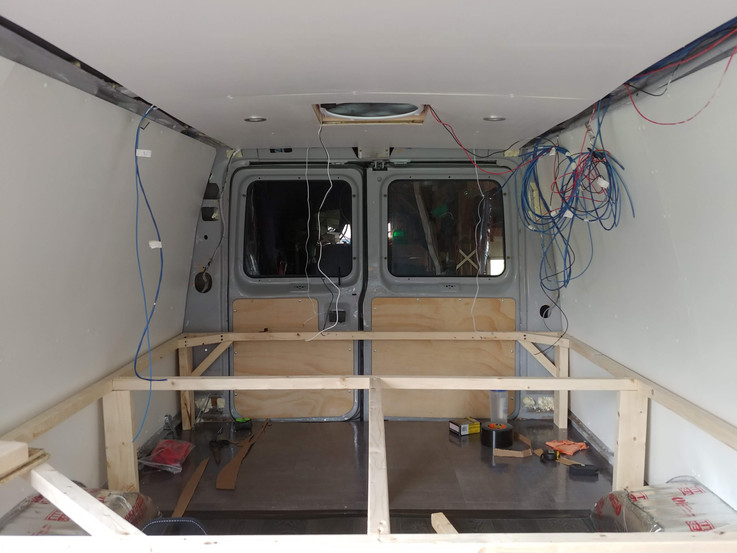
We covered the insulation on the walls and ceiling with 1/4" plywood then used the same primer/paint. Since the van is not square... at all... anywhere... more stencils were used to get the measurements correct before cutting. The plywood was just pliable enough to curve with the slope of the walls and ceiling. Added a few studs in places to bring the wall out to the plywood and screwed it up using sheet metal screws (the wide heads keep the screw from busting through the plywood and they’re strong enough to stay put in the studs).
The bed is framed out of 2x4's, 2x2's and 1/2" plywood. The best tool for jobs like this, by far, is the Kreg Pocket Hole Jig. Using the jig, we counter-sunk everywhere we could to make a strong connection and so there wouldn’t be screwheads sticking out all over.
After the bed frame was built, there was a lot of debating and discussion between us to figure out the best way to use the remaining space for storage. We used leftover plywood to build around the cooler, the Goal Zero and blue storage boxes that we kept from our apartment. At this point, we literally looked at the material we had left and tried to figure out the most efficient way to use it. The rest of the build followed this same tactic. The overhead cabinets that Justin built were salvaged from old weathered pine board that Uncle Paul had lying around in his barn, the doors are from a bookshelf from our apartment.


Electrical
Like everything else, there’s several ways to setup your electrical as well. The size and cost of an electrical setup in a van all depends on how much energy consumption you plan to use and how much cheddar you want to fork over. DIY setups usually consist of a battery bank, solar panels, inverter, relays and a power panel. And they are completely scalable to the size your bank account will allow. We decided to stick with Goal Zero for our electrical; the Yeti 1400 with an MPPT module and two Boulder 100W Solar Panels.
This package provides us with more than enough wattage to stay off grid for a long time (with enough sun…or until we run out of water). With the help of Uncle Paul and Savaria’s cousin, Colton, we were able to figure out a way to connect the Yeti to the van so it can charge while we drive, simultaneously charging from the solar panels. We also wanted the lights, vent fan and any outlets we installed to be able to run off the van if the Yeti was disconnected. As it is, the GZ Yeti can be removed and used as it was meant to be, a mobile battery powered generator, and the lights and fan will still run while the van is on.
A brief overview of our setup: The GZ Yeti 1400 runs the power panel (all the appliances connected to it) via an Anderson connector and wire from the Yeti output. The van charges the Yeti through an auto relay (for safety) via the same connectors through the MPPT module on the Yeti (I manually swap the solar and the van when we’re not driving). A DPDT switch was wired up to the van’s ignition to auto switch the appliances to the van’s power when it’s running.
The solar panels are mounted to aluminum angles and attached to the roof racks using U-bolts. If anyone would like more details of how we setup the electrical, please reach out to us and ask. Justin will be happy to share diagrams and specifics!


The Finished Product

Our first setup for the maiden voyage (pictured above, still finishing everything up) we were using an old 12v fridge that was at my parents' house and we had a large bin that we placed in front of the bed with all our dry goods, plates, bowls and silverware. Both of these were less than ideal. The cooler would only get 20 degrees below ambient temp, it had to be constantly plugged in and monitored and therefore it would drain our power supply. Then getting anything out of the bin was a chore in and of itself. The maiden voyage was a great learning experience because we figured out what was working and what didn't.

After the maiden voyage Justin made this really awesome drawer that we keep our dry goods in, where it keeps things more organized and easier to grab. We are able to set the water jug on top when we are stationary. The plastic container on top holds our spices, tea and energy bars. The green container above that usually holds potatoes and onions. Below, our Coleman stove, propane tanks and cooking utensils fit perfectly! Originally we had the stove and water stored in the back and it was a pain to grab everything in two different areas especially when trying to be stealthy.


Justin installed a swivel seat on the passenger seat but after the maiden voyage and crouching trying to sit on the bed we decided we needed another seat where we could sit up straight. So we made one out of an old box Uncle Paul had. Even more fun... it doubles as storage! Eventually, we got the perfect cushion for it too from our cousin-in-law Matt.

After a few more months on the road we decided it was time to spend the money and get a better 12v cooler. This forced us to rearranged our shelving a bit to accommodate the taller unit. It has been an excellent addition. It keeps our food cold (sometimes frozen) and doesn't draw nearly as much energy as the previous cooler. We didn't add doors on the cabinet area because that was more material and more weight.

After all is said and done, if we could redo the whole thing over again... we would. We learned so much and put a ton of work into Cloud. We know that it’s not our forever home. We are still making adjustments as we travel, acquire new items, and think of new ways to make our setup more comfortable. But we always weigh whether the amount of time we put in to Cloud is worth it compared to the amount of time we have left in our trip.
Big thank you to Uncle (Google/Amazon) Paul for his guidance and letting us store the van all winter and work on it and answer a million questions. Thank you to Savaria's parents for letting us driveway surf, feed us, and all the other essentials. Colton and Matt for their knowledge and everyone else who offered to help or encouraged us to take this journey!

Comments